How to Analyze Reviews with Elasticsearch and Amazon Comprehend
In this tutorial, we will set up a system to analyze customer reviews using Elasticsearch and Amazon Comprehend. We will leverage Amazon Comprehend for sentiment analysis and Elasticsearch for indexing, searching, and visualizing the data using Kibana. Our goal is to index customer reviews, perform sentiment analysis, and visualize insights to understand customer satisfaction and identify key areas for improvement.
Contents
Architecture Overview
- Amazon Comprehend: Performs sentiment analysis on customer reviews.
- Elasticsearch: Indexes and stores reviews, and enables querying and aggregations.
- Kibana: Provides visualization capabilities for the data in Elasticsearch.
Set Up Elasticsearch and Kibana
To begin, we’ll set up Elasticsearch and Kibana on our local machine. This local setup is ideal for development and testing purposes.
Step 1: Install Elasticsearch
- Download Elasticsearch:
- Visit the Elasticsearch download page and download the version that is compatible with the operating system.
- Install Elasticsearch:
- Follow the installation instructions provided for your OS. After installation, start the Elasticsearch service.
- Extract the files and navigate to the
bindirectory. - Start Elasticsearch by running
./elasticsearch(Linux/Mac) orelasticsearch.bat(Windows).
- Verify Installation:
- Open a web browser and go to
https://localhost:9200. We should see a JSON response indicating that Elasticsearch is running.
- Open a web browser and go to
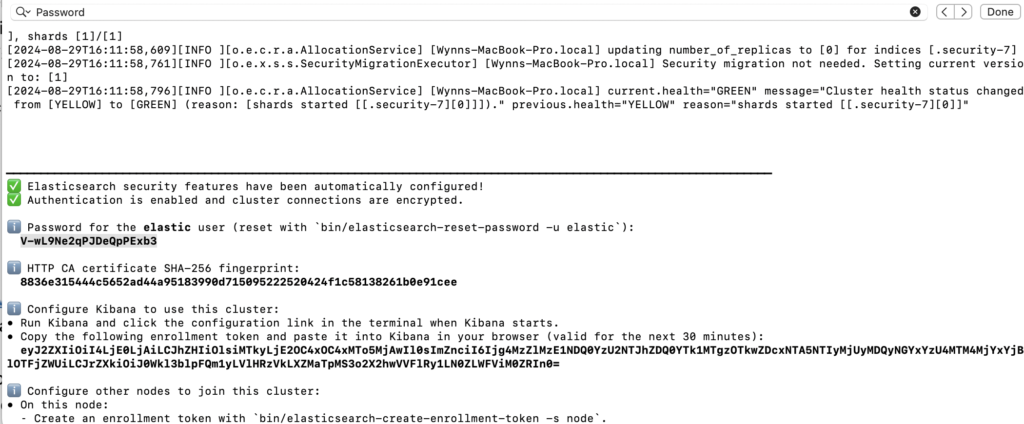
- Note that, Elasticsearch is secure by default in the latest version. You will be prompted to enter a username and password to access Elasticsearch.
- Look up the installation console for the username and password.
Step 2: Install Kibana
- Download Kibana:
- Visit the Kibana download page and download the version that is compatible with the Elasticsearch installation.
- Install Kibana:
- Follow the installation instructions for your OS. Start the Kibana service once installed.
- Extract the files and navigate to the
bindirectory. - Start Kibana by running
./kibana(Linux/Mac) orkibana.bat(Windows).
- Access Kibana:
- Open a web browser and navigate to
http://localhost:5601. We should see the Kibana dashboard.
- Open a web browser and navigate to
- You will be prompted to enter the enrollment token, look up the token from the Elasticsearch installation console in Step 1.
Create an Elasticsearch Index for Reviews
An Elasticsearch index is like a database table where we store our data. Here, we’ll create an index to store customer reviews. We will use Kibana’s Dev Tools to create the Elasticsearch index as Kibana provides a user-friendly interface for interacting with Elasticsearch.
Step 3: Create an Elasticsearch Index
- Open Kibana’s Dev Tools:
- Go to the Kibana dashboard and navigate to Dev Tools.
- Create an Index:
- In Dev Tools, enter the following command to create an index called
customer-reviews:
- In Dev Tools, enter the following command to create an index called
PUT /customer-reviews
{
  "mappings": {
    "properties": {
      "review_id": { "type": "keyword" },
      "product_id": { "type": "keyword" },
      "category_id": { "type": "keyword" },
      "product_name": { "type": "text" },
      "review_text": { "type": "text" },
      "sentiment_score": { "type": "keyword" },
      "key_phrases": { "type": "keyword" },
      "toxicity_level": { "type": "keyword" },
      "timestamp": { "type": "date" }
    }
  }
}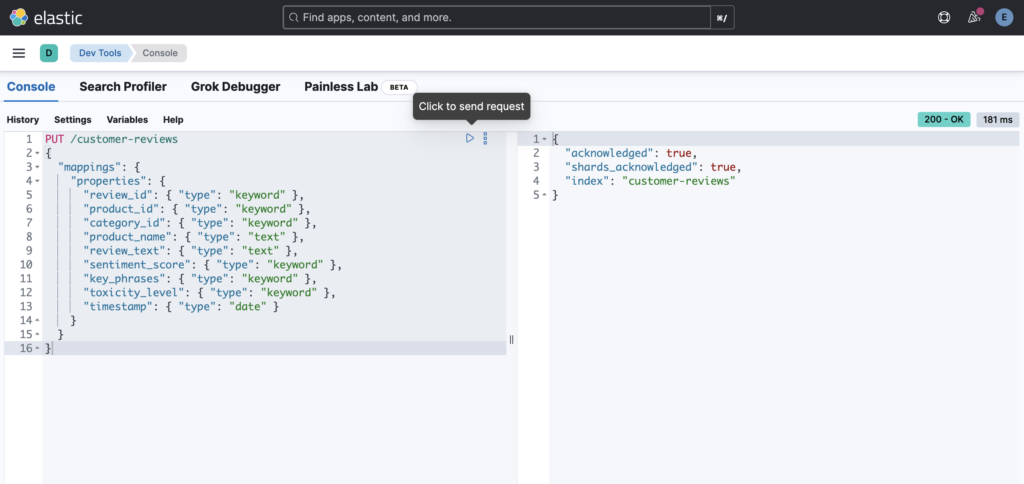
This index will store all the necessary details about each review, including the product ID, category, review text, sentiment, and more.
Analyzing Reviews with Amazon Comprehend
Next, we’ll use Amazon Comprehend to perform sentiment analysis on the reviews and extract key phrases.
Step 4: Set Up AWS Credentials
To use Amazon Comprehend, we need to configure our AWS credentials. This allows our script to access the Comprehend service.
- Install AWS CLI:
- Follow the instructions to install AWS CLI.
- Configure AWS CLI:
- Run
aws configurein our terminal and enter the AWS Access Key, Secret Key, region, and output format.
- Run
Step 5: Analyze Reviews
We’ll write a Python script to analyze the reviews, perform sentiment analysis, and then index the enriched data into Elasticsearch.
Navigate to your project directory and create a virtual environment:
cd /path/to/your/project
python3 -m venv path/to/venv
Activate the virtual environment using the following command:
source path/to/venv/bin/activateInstall Required Libraries:
With the virtual environment activated, install the necessary libraries:
pip3 install boto3 elasticsearch mysql-connector-pythonWrite the Script:
import mysql.connector
import json
import boto3
from elasticsearch import Elasticsearch

# Initialize clients
es = Elasticsearch(['http://localhost:9200'])
comprehend = boto3.client('comprehend')

# Connect to MySQL database
db_connection = mysql.connector.connect(
    host="your_database_host",
    user="your_database_user",
    password="your_database_password",
    database="your_database_name"
)

cursor = db_connection.cursor(dictionary=True)

def fetch_reviews():
    cursor.execute("SELECT * FROM reviews")
    return cursor.fetchall()

def analyze_text(text):
    # Analyze sentiment
    sentiment_response = comprehend.detect_sentiment(Text=text, LanguageCode='en')
    sentiment = sentiment_response['Sentiment']

    # Detect toxic content
    toxic_content_response = comprehend.detect_toxic_content(TextSegments=[{'Text': text}], LanguageCode='en')
    labels = toxic_content_response['ResultList'][0]['Labels']

    # Extract individual scores
    hate_speech_score = next((label['Score'] for label in labels if label['Name'] == 'HATE_SPEECH'), 0)
    harassment_abuse_score = next((label['Score'] for label in labels if label['Name'] == 'HARASSMENT_OR_ABUSE'), 0)
    insult_score = next((label['Score'] for label in labels if label['Name'] == 'INSULT'), 0)
    violence_threat_score = next((label['Score'] for label in labels if label['Name'] == 'VIOLENCE_OR_THREAT'), 0)

    # Determine the overall toxicity level
    toxicity_level = 'Non-Toxic'
    if hate_speech_score > 0.5:
        toxicity_level = 'Hate Speech'
    elif harassment_abuse_score > 0.5:
        toxicity_level = 'Harassment or Abuse'
    elif insult_score > 0.5:
        toxicity_level = 'Insult'
    elif violence_threat_score > 0.5:
        toxicity_level = 'Violence or Threat'

    # Extract key phrases
    keyphrase_response = comprehend.detect_key_phrases(Text=text, LanguageCode='en')
    keyphrases = [phrase['Text'] for phrase in keyphrase_response['KeyPhrases']]

    result = {
        'sentiment': sentiment,
        'key_phrases': keyphrases,
        'toxicity_level': toxicity_level
    }

    return result

def process_reviews():
    reviews = fetch_reviews()
    for review in reviews:
        sentiment_data = analyze_text(review['review_text'])
        review.update({
            'sentiment_score': sentiment_data['sentiment'],
            'key_phrases': sentiment_data['key_phrases'],
            'toxicity_level': sentiment_data['toxicity_level']
        })

        # Index into Elasticsearch
        es.index(index='customer-reviews', id=review['review_id'], document=review)

# Process and index the reviews
process_reviews()

# Close the database connection
cursor.close()
db_connection.close()
We can set up a cron job or a scheduled task to run this script periodically to keep our Elasticsearch index updated with the latest reviews from the database.
The processed review data, now containing sentiment scores, key phrases, and toxicity levels, is indexed in Elasticsearch. The reviews are stored in an index called customer-reviews with defined mappings for each field.
...

{
  "_index": "customer-reviews",
  "_id": "2",
  "_score": 1,
  "_source": {
    "review_id": "2",
    "product_id": "123",
    "category_id": "phones",
    "product_name": "SuperPhone X",
    "review_text": "Not satisfied with the battery life. It doesn't last a full day with heavy usage.",
    "timestamp": "2024-08-02T15:30:00",
    "sentiment_score": "NEGATIVE",
    "key_phrases": [
      "the battery life",
      "a full day",
      "heavy usage"
    ],
    "toxicity_level": "Non-Toxic"
  }
},

...
Visualize Data with Kibana
Integrating Kibana with Elasticsearch to visualize the data is a key part of this setup. Now that our data is indexed in Elasticsearch, we can use Kibana to create visualizations that help us understand customer feedback.
Create an Index Pattern in Kibana:
Navigate to Index Patterns:
- In Kibana, go to Management > Stack Management > Index Patterns.
Create a New Index Pattern:
- Click on Create index pattern.
- Enter the name of your Elasticsearch index (e.g.,
customer-reviews). - Click Next step.
- Choose the
timestampfield as the time filter (if applicable) to enable time-based analysis. - Click Create index pattern.
Explore Data in Kibana:
- Go to Discover in the Kibana sidebar.
- Select your index pattern (
customer-reviews) from the dropdown menu. - You should see a list of documents (reviews) that you indexed into Elasticsearch.
- Use the search bar to filter and explore the data, such as searching for specific sentiments, products, or key phrases.
Create Visualizations:
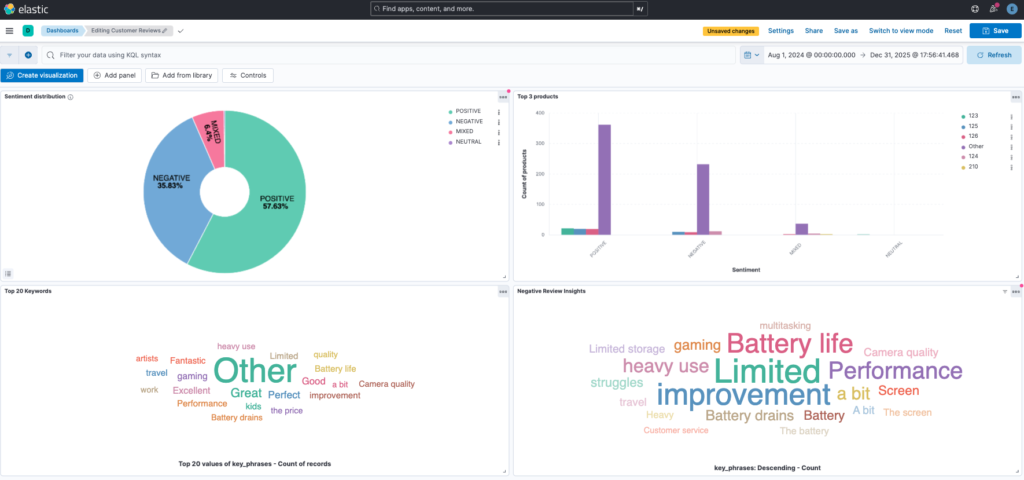
We can create several visualizations to gain insights into the reviews:
1. Pie Chart: Sentiment distribution
Purpose: To see the distribution of sentiment (positive, neutral, negative) across all reviews.
Create a Pie Chart Visualization:
- Go to Visualize Library > Create visualization > Aggregation based > Pie.
- Select our
customer-reviewsindex pattern - In the Buckets section, we should be able to add a bucket.
- Click on Add Bucket.
- Select Split Slices, you should see options for aggregations.
- Under the Aggregation dropdown, select Terms.
- In the Field dropdown, select the sentiment field
sentiment_score.
2. Vertical Bar: Top 3 Products
Purpose: To see the top 3 products that have the most positive or negative reviews.
Create a Vertical Bar Chart Visualization:
- Go to Visualize Library > Create visualization > Aggregation based > Vertical Bar.
- Select our
customer-reviewsindex pattern - In the Y-Axis, choose a metric like Count.
- Click on Add Bucket.
- Select X-Axis.
- In the X-Axis, choose Terms aggregation and set Field to
sentiment_score. - Click on Add Bucket
- Select Split Series
- Under the sub-aggregation dropdown, select Terms.
- In the Field dropdown, select the sentiment field
product_id. - Set the size to 3.
Here’s how we can leverage both negative reviews and key phrases to pinpoint and address issues:
Steps to Identify Areas for Improvement
1. Filter Negative Reviews
- Navigate to Discover:
- Go to the Discover section in Kibana to view raw data from your
customer-reviewsindex.
- Go to the Discover section in Kibana to view raw data from your
- Apply Filters:
- Add Filter: Click on the “Add filter” button.
- Configure Filter:
- Field: Select
sentiment_score. - Operator: Choose “is”.
- Value: Enter “NEGATIVE” or equivalent based on your sentiment scoring.
- Field: Select
- Save and Apply:
- Save the filter to view only the negative reviews.
2. Analyze Key Phrases in Negative Reviews
- Create a Key Phrase Visualization for Negative Reviews:
- Go to Visualize Library and create a new visualization.
- Choose a visualization type like a Tag Cloud.
- Bucket Aggregation:
- Add Tags, and select Terms as the aggregation.
- Set the field to
key_phrases.
- Metrics:
- Set the metric to “Count” to show the frequency of each key phrase in negative reviews.
- Customize and Save:
- Adjust the visualization settings to focus on the most frequent key phrases.
3. Interpret Insights
A. Identify Common Issues:
- Key Phrases: Look at the key phrases identified in the visualizations. Frequent phrases in negative reviews will highlight common complaints or issues.
- Sentiment Analysis: Confirm that the sentiment associated with these key phrases is negative to ensure they reflect genuine problems.
B. Understand the Context:
- Review Text: Click on individual negative reviews to understand the context and specifics of the complaints. This will help you identify if the issues are related to product quality, customer service, delivery, etc.
C. Take Action:
- Address Issues: Use the insights to address the common issues. For instance, if “battery drains” is frequently mentioned, we may need to improve the products’ battery life.
By focusing on negative reviews and analyzing the associated key phrases, we can gain actionable insights that help improve customer satisfaction and address specific areas that need attention.
Conclusion
In this advanced tutorial, we’ve set up a system to analyze customer reviews using Elasticsearch and Amazon Comprehend. We performed sentiment analysis, extracted key phrases, and detected toxic content. By integrating these analyses into Elasticsearch, we created powerful visualizations in Kibana to gain deep insights into customer satisfaction and identify areas for improvement.
Share this content:
