How to Secure AWS API Gateway Endpoints with Lambda Authorizers and JWT Role-Based Access Control
In this tutorial, we’ll guide you through the process of securing AWS API Gateway endpoints using a Lambda authorizer with JWT-based role-based access control. We’ll also leverage AWS Secrets Manager to securely store the secret key used for JWT validation. This setup will ensure that only authorized users with appropriate roles can access specific API resources.
Contents
- 0.1 Understanding Lambda Authorizer:
- 0.2 Here’s how it works:
- 0.3 Step 1: Store the Secret Key in AWS Secrets Manager
- 0.4 Step 2: Create an IAM Role for the Lambda Authorizer
- 0.5 Step 2: Create a Lambda Function for the Authorizer
- 0.6 Step 3: Create an API Gateway REST API
- 0.7 Step 5: Configure the API Gateway Authorizer
- 0.8 Step 6: Create an API Gateway Resource and Method
- 0.9 Step 7: Deploy the API
- 0.10 Testing the API
- 1 Conclusion
Understanding Lambda Authorizer:
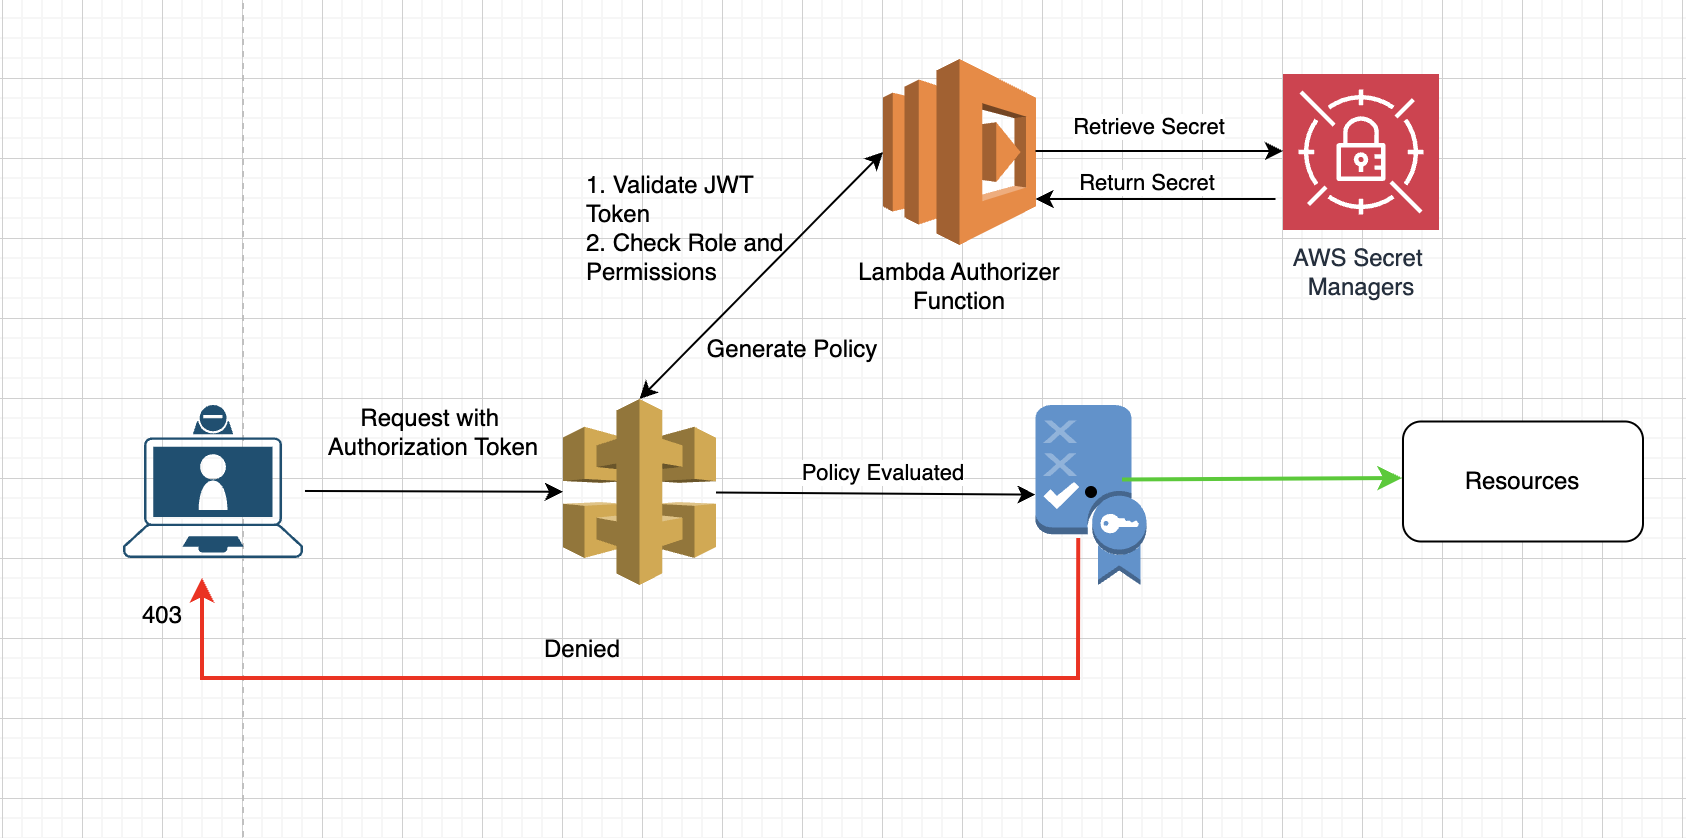
A Lambda authorizer is a custom authorization mechanism for API Gateway that allows us to use our own logic to determine if a user is authorized to access an API resource. By implementing role-based access control (RBAC) in our Lambda authorizer and securely storing our secret key in AWS Secrets Manager, we can achieve fine-grained control over API access based on user roles and permissions.
Here’s how it works:
- When a client sends a request to your API Gateway, the request is first intercepted by the Lambda authorizer.
- The Lambda authorizer retrieves the secret key from AWS Secrets Manager.
- The authorizer validates the JWT token using the secret key and extracts user roles.
- The authorizer checks the extracted roles against the requested API method.
- The Lambda authorizer returns an “allow” or “deny” policy to the API Gateway based on the role-based checks.
- If allowed, the request proceeds to the API resource; otherwise, the client receives an error.
Step 1: Store the Secret Key in AWS Secrets Manager
- Navigate to the AWS Secrets Manager dashboard.
- Click on “Store a new secret”.
- Choose “Other type of secret” and enter the JWT secret key (e.g., “my_secret_key”).
- Name your secret (e.g., “jwt-secret-key”) and store it.
Step 2: Create an IAM Role for the Lambda Authorizer
When creating an IAM role for the Lambda authorizer, it’s essential to understand the permissions required by the Lambda function. In this case, we need to grant the Lambda function execution role the necessary permissions to execute the authorizer code.
- Log in to the AWS Management Console and navigate to the IAM dashboard.
- Click on “Roles” in the left-hand menu and then click on “Create role”.
- Choose “Lambda” as the service that the role will be used with.
- Attach the “AWSLambdaExecute” policy to the role.
- Attach a custom policy to allow access to AWS Secrets Manager.
- Click on “Add permissions” and then “Create inline policy”.
- Choose the “JSON” tab and enter the following policy JSON, replacing
"your-secret-arn"with the ARN of your secret.
{
    "Version": "2012-10-17",
    "Statement": [
        {
            "Effect": "Allow",
            "Action": [
                "secretsmanager:GetSecretValue",
                "secretsmanager:DescribeSecret"
            ],
            "Resource": "arn:aws:secretsmanager:ap-southeast-1:xxx:secret:jwt-secret-key-3nYSQm"
        }
    ]
}- Review the policy and give it a name (e.g., “SecretsManagerAccessPolicy”).
- Attach the policy to the role.
- Name the role (e.g., “lambda-authorizer-role“) and create it.

Step 2: Create a Lambda Function for the Authorizer
Next, we’ll create a Lambda function that will serve as the authorizer for our API Gateway. We will use Node.js as the runtime for this function.
- Navigate to the Lambda dashboard and click on “Create function”.
- Choose “Author from scratch” and select “Node.js” as the runtime.
- Name the function (e.g., “api-gateway-authorizer”) and set the handler to “index.handler“.
- Set the environment variable “AUTHORIZER_SECRET” to a secret value (e.g., “my_secret_key”).
- Set the role to the IAM role we created in Step 1.
- Create the function.
The authorizer code is responsible for validating incoming requests and returning an authorization response. In this example, we’re using a simple token-based authentication mechanism:
import jwt from 'jsonwebtoken';
import { SecretsManagerClient, GetSecretValueCommand } from '@aws-sdk/client-secrets-manager';

export const handler = async (event) => {
  const client = new SecretsManagerClient();
  const secretName = 'jwt-secret-key';
  let secret;

  try {
    // Fetch the secret from Secrets Manager
    const command = new GetSecretValueCommand({ SecretId: secretName });
    const data = await client.send(command);
    secret = JSON.parse(data.SecretString).my_secret_key;
  } catch (err) {
    console.error('Error retrieving secret from Secrets Manager:', err);
    return generatePolicy('anonymous', 'Deny', event.methodArn);
  }

  const token = event.headers.authorization;
  if (!token) {
    return generatePolicy('anonymous', 'Deny', event.methodArn);
  }

  try {
    // Verify the JWT token
    const decoded = jwt.verify(token, secret);
    const roles = decoded.roles; // Extract roles from JWT
    if (hasAccess(roles, event.methodArn)) {
      return generatePolicy(decoded.sub, 'Allow', event.methodArn);
    } else {
      return generatePolicy(decoded.sub, 'Deny', event.methodArn);
    }
  } catch (err) {
    console.error('JWT validation error:', err);
    return generatePolicy('anonymous', 'Deny', event.methodArn);
  }
};

// Function to check if user has access based on roles
const hasAccess = (roles, methodArn) => {
  // Define role-based access logic here
  // Example: return true if the role has permission to access the resource
  return roles.includes('admin') || (roles.includes('user') && methodArn.includes('GET'));
};

// Function to generate policy document
const generatePolicy = (principalId, effect, resource) => {
  const authResponse = {};
  authResponse.principalId = principalId;
  if (effect && resource) {
    const policyDocument = {
      Version: '2012-10-17',
      Statement: [
        {
          Action: 'execute-api:Invoke',
          Effect: effect,
          Resource: resource,
        },
      ],
    };
    authResponse.policyDocument = policyDocument;
  }
  return authResponse;
};
When our Lambda authorizer function is invoked by API Gateway, it must return a policy document that specifies whether the request is allowed or denied. This policy document is an IAM policy that API Gateway uses to make an authorization decision.
Here’s a breakdown of the policy document and its components:
- Principal ID: This is the identifier of the user or entity to whom the policy applies. It’s typically extracted from the JWT or other tokens. In our example, it’s the
principalIdin thegeneratePolicyfunction. - Policy Document: This is an IAM policy that defines what actions are allowed or denied. It consists of a list of statements, where each statement specifies an action, effect, and resource.
- Version: Specifies the version of the policy language. Use “2012-10-17” for all policy documents.
- Statement: An array of statements, each defining a specific permission.
- Statement Components:
- Action: The specific action that is allowed or denied. For API Gateway, this is typically
execute-api:Invoke, which allows invoking an API method. - Effect: Either “Allow” or “Deny”, specifying whether the action is allowed or denied.
- Resource: Specifies the resource to which the action applies. For API Gateway, this is the ARN of the API method being invoked.
- Action: The specific action that is allowed or denied. For API Gateway, this is typically
Step 3: Create an API Gateway REST API
Now, let’s create an API Gateway REST API that will integrate with our Lambda authorizer.
- Navigate to the API Gateway dashboard and click on “Create API”.
- Choose “REST API” and give your API a name (e.g., “my-api”).
- Create the API.
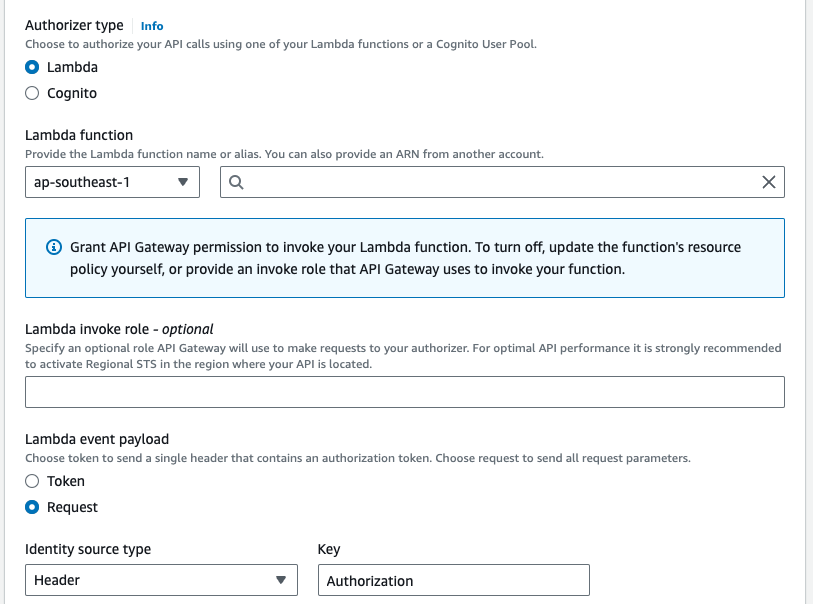
Step 5: Configure the API Gateway Authorizer
In this step, we’ll configure the API Gateway to use our Lambda authorizer.
- In the API Gateway dashboard, click on “Authorizers” in the left-hand menu.
- Click on “Create authorizer“.
- Choose “Lambda function” as the authorizer type.
- Select the Lambda function we created in Step 2.
- Choose “Request” as the Lambda event payload.
- Set the “Identity sources” to the “Authorization” header. This tells API Gateway to pass the value of the Authorization header to the Lambda authorizer.
- Create the authorizer.
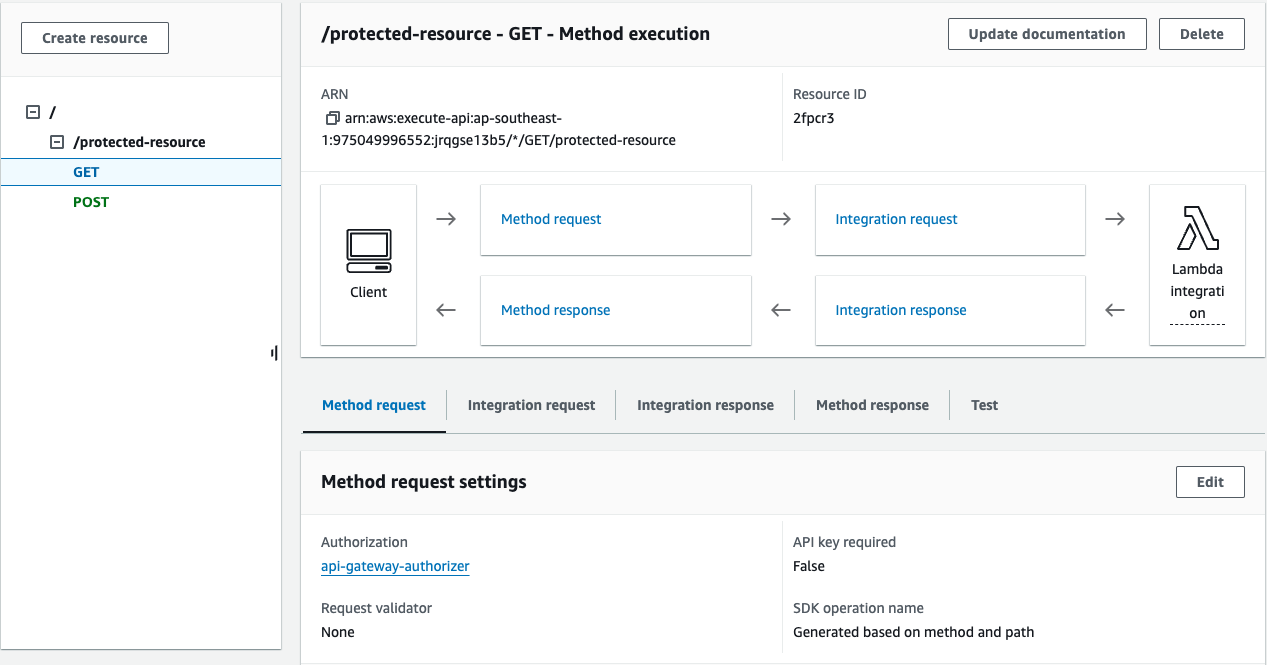
Step 6: Create an API Gateway Resource and Method
Next, we’ll create an API Gateway resource and method that will be protected by our authorizer.
- In the API Gateway dashboard, click on “Resources” in the left-hand menu.
- Click on “Create resource”.
- Give the resource a name (e.g., “protected-resource”) and create it.
- Select the newly created resource (
protected-resource). - Click “Create Method” from the dropdown list.
- Select “GET” from the method options and click the checkmark.
- Configure the GET method:
- Choose “Lambda Function” as the integration type.
- Select the Lambda Region.
- Enter the name of the Lambda function that handles GET requests.
- Under the Method Request, select the “api-gateway-authorizer” for Authorization.
- Click “Save” and then “OK” to grant API Gateway permissions to invoke the Lambda function.
- With the resource (
protected-resource) still selected, click “Create Method”. - Select “POST” from the method options and click the checkmark.
- Configure the POST method:
- Choose “Lambda Function” as the integration type.
- Select the Lambda Region.
- Enter the name of the Lambda function that handles POST requests.
- Under the Method Request, select the “api-gateway-authorizer” for Authorization.
- Click “Save” and then “OK” to grant API Gateway permissions to invoke the Lambda function.
Ensure that our API Gateway is correctly configured to pass data to the Lambda function:
- Select the resource “protected-resource” and the method (e.g., GET, POST).
- Click on “Integration Request.”
- Click Edit.
- Under “Mapping Templates,” click “Add mapping template.”
- Set the content type (e.g.,
application/json). - Select the “Method request passthrough” as Generate template
- Click Save.
Step 7: Deploy the API
Finally, let’s deploy our API to a production-ready environment.
- In the API Gateway dashboard, click on “Actions” and then click on “Deploy API”.
- Choose “New stage” and give it a name (e.g., “prod”).
- Deploy the API.
Testing the API
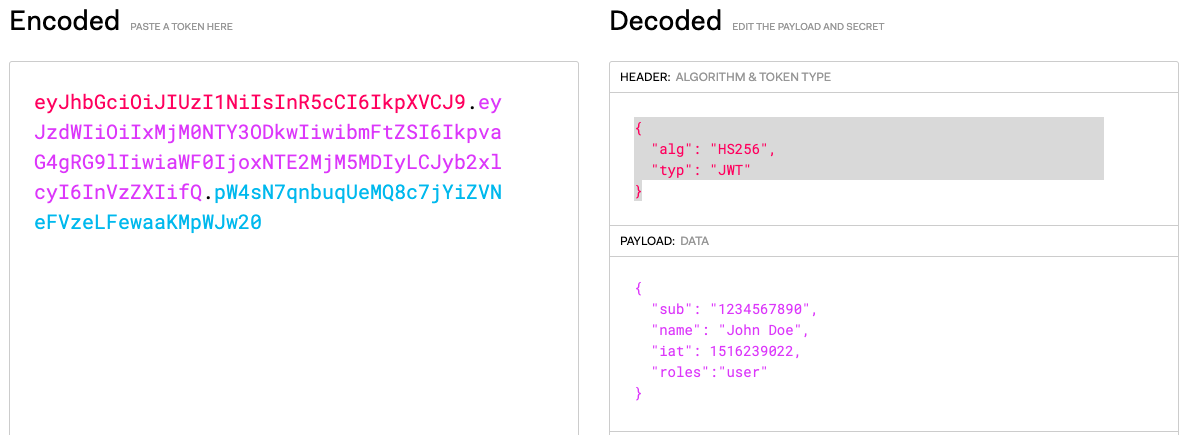
To test our API, we’ll use a tool like Postman or cURL to send a GET request to the API endpoint. Include the “Authorization” header with the JWT token to test the secured GET and POST methods.
We may go to the JWT webpage to generate a test token:
GET Request:
curl -H "Authorization: your_jwt_token" https://your-api-id.execute-api.your-region.amazonaws.com/prod/protected-resource
POST Request:
curl -X POST \
  -H "Authorization: your_jwt_token" \
  -H "Content-Type: application/json" \
  -d '{"key":"value"}' \
  https://jrqgse13b5.execute-api.ap-southeast-1.amazonaws.com/prod/protected-resource
This request is being rejected because the user’s role is “user“. Now, let’s try to regenerate the JWT token with the admin role.

Now, we can pass through the POST request.
Conclusion
In this tutorial, we demonstrated how to secure AWS API Gateway endpoints using Lambda authorizers and JWT role-based access control. We created a Lambda authorizer to validate JWTs and enforce access based on user roles. We also integrated AWS Secrets Manager to securely store the JWT secret key. By configuring API Gateway resources and methods with the Lambda authorizer and deploying the API, we ensured that only authorized users could access the endpoints according to their roles.
Share this content:
Leave a Comment