Chat Application with Django Channels 4, Redis and ReactJS
This post will guide you through the process of building a robust real-time chat application using Django Channels 4, Redis, and ReactJS.
Introduction
Django applications are typically deployed using WSGI servers like Gunicorn or uWSGI. The WSGI (Web Server Gateway Interface) server communicates with the Django application using the WSGI standard. Django is designed to handle synchronous, request-response style interactions. However, for real-time applications such as chat or notifications, where long-lived connections and asynchronous communication are required, Django Channels come into play.
Django Channels is an extension to Django that adds support for handling WebSockets and other asynchronous protocols. Unlike traditional HTTP, which follows a request-response model, WebSockets provide a full-duplex communication channel over a single, long-lived connection. When a WebSocket connection is established, Django Channels uses the ASGI (Asynchronous Server Gateway Interface) protocol to manage the connection. ASGI is an asynchronous version of WSGI designed to handle asynchronous applications.
* If you are using Channels 3 or below, it doesn’t necessarily require Daphne as Channels 3 has its server, while Channels 4 requires an explicitly configured ASGI server like Daphne
Daphne is an ASGI server that’s commonly used with Django Channels. Daphne is designed to serve Django applications that use Channels and can handle both HTTP and WebSocket connections. Adding “daphne” to INSTALLED_APPS instruct Django to automatically load and configure Daphne during development. This saves us from manually setting up and managing the server separately, streamlining the workflow. We can leverage the runserver command to start both the Django application and the Daphne server simultaneously.
Backend Implementation
Before we begin, make sure you have the Python installed. You may visit https://www.python.org/downloads and download the latest version of Python. Open a terminal and run the following command to verify:
python -vSetup virtualenv
Virtualenv is a tool that creates isolated Python environments. This is useful for development. To install virtualenv, run the following commands in your terminal:
mkdir django_channels_chatapp
cd django_channels_chatapp

pip3 install virtualenv
virtualenv env
source env/bin/activate

pip3 install --upgrade pip
Setup Django Project and App
Start by creating a new Django project and a Django app to encapsulate the API:
pip3 install django djangorestframework daphne channels psycopg2-binary

### This is the versioning of library used in this tutorial ###
asgiref==3.7.2
channels==4.0.0
channels-redis==4.1.0
daphne==4.0.0
Django==4.2.7

django-admin startproject backend
cd backend
python3 manage.py startapp api
Now that the api application has been created, we need to configure it in the INSTALLED_APPS in the settings.py. This will enable the app features such as the app’s models, views, forms, or other components to be available in the Django project. At the same time, we also need to include Channels.
# settings.py

INSTALLED_APPS = [
    # ...
    "daphne",
    "django.contrib.staticfiles",
    "channels",
    "rest_framework",
    "api",
]
ASGI Configuration:
Create a new file named asgi.py in the project’s root:
os.environ.setdefault('DJANGO_SETTINGS_MODULE', 'backend.settings')

application = ProtocolTypeRouter({
    'http': get_asgi_application(),
    'websocket': AuthMiddlewareStack(
        URLRouter(
            # Define your WebSocket routing here
        )
    ),
})
We’ll update the WebSocket routing in the next steps. Now, we need to let Django know where to locate the ASGI application. Add the following line to the settings.py.
ASGI_APPLICATION = 'backend.asgi.application'Setting Up Redis Server
Redis is an in-memory data store that offers high-performance data retrieval and manipulation. It’s a popular choice for real-time applications due to its ability to handle large volumes of data with low latency. In a chat application, Redis can be used to store real-time message data and user presence information, enabling efficient message delivery and user-to-user interaction. In a Django Channels real-time chat application, Redis is commonly used as the backend for the Channel Layer.
Run the command below to start up the Redis server.
# To install redis server
brew install redis

# To start the redis server
redis-server
Setting Up Channel Layer
The Channel Layer is a crucial component of Django Channels responsible for managing WebSocket connections and handling real-time events.
channels-redis is a Django Channels channel layer that uses Redis as the backing store. We can install it using pip:
pip3 install channels-redisIn the Django project settings, we need to configure channels to use the Redis channel layer. Update the CHANNEL_LAYERS setting:
REDIS_HOST = os.environ.get("REDIS_HOST", "redis")
REDIS_PORT = os.environ.get("REDIS_PORT", 6379)
CHANNEL_LAYERS = {
    "default": {
        "BACKEND": "channels_redis.core.RedisChannelLayer",
        "CONFIG": {
            "hosts": [(REDIS_HOST, REDIS_PORT)],
        },
    },
}
Create Models
In Django, models serve as blueprints for the data that your application handles and stores. Each model corresponds to a database table and outlines the characteristics, or fields, that each entry in that table should possess. To represent the chat data, we define two models in models.py: Room and Message.
class Room(models.Model):
    name = models.CharField(max_length=100)
    userslist = models.ManyToManyField(to=User, blank=True)

class Message(models.Model):
    user = models.ForeignKey(to=User, on_delete=models.CASCADE)
    room = models.ForeignKey(Room, related_name="messages", on_delete=models.CASCADE)
    content = models.TextField()
    timestamp = models.DateTimeField(auto_now_add=True)

    class Meta:
        db_table = "chat_message"
        ordering = ("timestamp",)
Run migrations:
python manage.py makemigrations
python manage.py migrate
Create Serializers
Serializers act as bridges between Django model instances and standard Python data structures, like dictionaries or lists. This facilitates seamless data exchange between the application and external entities, such as APIs or web clients. Serializers also serve as data validators, ensuring the integrity of incoming information. We define a corresponding serializer for each model in serializers.py.
class RoomSerializer(serializers.ModelSerializer):
    class Room:
        model = Room
        fields = ("id", "name", "userslist")

class MessageSerializer(serializers.ModelSerializer):
    class Meta:
        model = Message
        fields = ("id", "room", "user", "content", "timestamp")
        read_only_fields = ("id", "timestamp")
Create Chat Consumers
The consumer establishes WebSocket connections, manages message creation, and broadcasts messages to all connected clients in a specific room. We create a consumers.py file in the chat app to handle real-time chat interactions.
class ChatConsumer(AsyncWebsocketConsumer):
    def __init__(self, *args, **kwargs):
        super().__init__(*args, **kwargs)
        self.room_name = None
        self.room_group_name = None
        self.room = None
        self.user = None

    async def connect(self):
        print("Connecting...")

        self.room_name = self.scope["url_route"]["kwargs"]["room_name"]
        self.user = self.scope["user"] or "Anonymous"

        if not self.room_name or len(self.room_name) > 100:
            await self.close(code=400)
            return

        self.room_group_name = f"chat_{self.room_name}"
        self.room = await self.get_or_create_room()

        # Join room group
        await self.channel_layer.group_add(self.room_group_name, self.channel_name)
        await self.accept()

        await self.create_online_user(self.user)
        await self.send_user_list()

    async def disconnect(self, close_code):
        await self.channel_layer.group_discard(self.room_group_name, self.channel_name)
        await self.remove_online_user(self.user)
        await self.send_user_list()

    async def receive(self, text_data=None, bytes_data=None):
        data = json.loads(text_data)
        message = data["message"]

        if not message or len(message) > 255:
            return

        message_obj = await self.create_message(message)

        await self.channel_layer.group_send(
            self.room_group_name,
            {
                "type": "chat_message",
                "message": message_obj.content,
                "username": message_obj.user.username,
                "timestamp": str(message_obj.timestamp),
            },
        )

    async def send_user_list(self):
        user_list = await self.get_connected_users()
        await self.channel_layer.group_send(
            self.room_group_name,
            {
                "type": "user_list",
                "user_list": user_list,
            },
        )

    async def chat_message(self, event):
        message = event["message"]
        username = event["username"]
        timestamp = event["timestamp"]

        await self.send(
            text_data=json.dumps(
                {"message": message, "username": username, "timestamp": timestamp}
            )
        )

    async def user_list(self, event):
        user_list = event["user_list"]

        await self.send(text_data=json.dumps({"user_list": user_list}))

    @database_sync_to_async
    def create_message(self, message):
        try:
            return Message.objects.create(
                room=self.room, content=message, user=self.user
            )
        except Exception as e:
            print(f"Error creating message: {e}")
            return None

    @database_sync_to_async
    def get_or_create_room(self):
        room, _ = Room.objects.get_or_create(name=self.room_group_name)
        return room

    @database_sync_to_async
    def create_online_user(self, user):
        try:
            self.room.online.add(user)
            self.room.save()
        except Exception as e:
            print("Error joining user to room:", str(e))
            return None

    @database_sync_to_async
    def remove_online_user(self, user):
        try:
            self.room.online.remove(user)
            self.room.save()
        except Exception as e:
            print("Error removing user to room:", str(e))
            return None

    @database_sync_to_async
    def get_connected_users(self):
        # Get the list of connected users in the room
        return [user.username for user in self.room.online.all()]
The ChatConsumer class inherits from AsyncWebsocketConsumer, indicating that it is designed to handle WebSocket connections asynchronously.
The connect method is executed when a WebSocket connection is established. It extracts the room name from the URL route kwargs and assigns it to self.room_name. It then forms the room group name using the room name and joins the channel to that group. Finally, it accepts the connection.
The disconnect method is called when a WebSocket connection is closed. It removes the channel from the room group to ensure it no longer receives messages.
The create_message method is decorated with @database_sync_to_async, indicating that it is a synchronous method converted to an asynchronous one to interact with the database. It creates a Message object using the provided room, message, and username. It saves the message to the database and returns the message object.
The receive method is called when a text message is received from the client. It parses the JSON data, extracts the message, username, and room object, and creates a new message object using the create_message method. It then broadcasts the message to all members of the room group using channel_layer.group_send.
The chat_message method is called when a message is received from the room group. It extracts the message, username, and timestamp from the event data and sends the message back to the WebSocket using self.send.
Next, we need to update the asgi.py to include the WebSocket routing:
application = ProtocolTypeRouter({
    'http': get_asgi_application(),
    'websocket': AuthMiddlewareStack(
        URLRouter(
            [
                re_path(r"ws/chat/(?P<room_name>\w+)/$", ChatConsumer.as_asgi()),
            ]
        )
    ),
})
Create Views
Views are responsible for handling HTTP requests and generating responses. They receive requests from clients, process data using models and serializers, and send back appropriate responses. We create a MessageList to retrieve all messages in views.py.
class MessageList(generics.ListCreateAPIView):
    queryset = Message.objects.all()
    serializer_class = MessageSerializer
    ordering = ('-timestamp',)

    def get_queryset(self):
        room_name = self.kwargs.get('room_name')
        if room_name:
            queryset = Message.objects.filter(room__name=room_name)
        else:
            queryset = Message.objects.all()
        return queryset
To create the corresponding URL for the MessageList view, we must define a path pattern matching the desired URL structure. Here’s an example of how to define the URL for retrieving messages by room:
urlpatterns = [
    path('chat/<slug:room_name>/messages/', views.MessageList.as_view(), name='chat-messages'),
]
Frontend Implementation
Now that we have a robust backend with Django Channels and Redis, it’s time to bring it to life with a dynamic frontend! Here’s a step-by-step guide to link up the chat app and get those messages flowing:
ReactJS Setup
Create a new React app in the project directory:
npx create-react-app frontendNavigate to the frontend directory and install the necessary dependencies:
cd frontend
npm install react-dom react-websocket axios
Chat Component
Create a new Chat.js component in the src directory to handle the user interface, message rendering, and WebSocket connections:
function Chat() {
  const [socket, setSocket] = useState(null);
  const [username, setUsername] = useState("");
  const [room, setRoom] = useState("");
  const [message, setMessage] = useState("");
  const [messages, setMessages] = useState([]);
  const [activeUsers, setActiveUsers] = useState([]);

  useEffect(() => {
    const storedUsername = localStorage.getItem("username");
    if (storedUsername) {
      setUsername(storedUsername);
    } else {
      const input = prompt("Enter your username:");
      if (input) {
        setUsername(input);
        localStorage.setItem("username", input);
      }
    }

    const storedRoom = localStorage.getItem("room");
    if (storedRoom) {
      setRoom(storedRoom);
    } else {
      const input = prompt("Enter your room:");
      if (input) {
        setRoom(input);
        localStorage.setItem("room", input);
      }
    }

    if (username && room) {
      const newSocket = new WebSocket(`ws://localhost:8000/ws/chat/${room}/`);
      setSocket(newSocket);

      newSocket.onopen = () => console.log("WebSocket connected");
      newSocket.onclose = () => {
        console.log("WebSocket disconnected");
        localStorage.removeItem("username");
        localStorage.removeItem("room");
      };

      return () => {
        newSocket.close();
      };
    }
  }, [username, room]);

  useEffect(() => {
    if (socket) {
      socket.onmessage = (event) => {
        const data = JSON.parse(event.data);
        if (data.user_list) {
          setActiveUsers(data.user_list);
        } else {
          setMessages((prevMessages) => [...prevMessages, data]);
        }
      };
    }
  }, [socket]);

  const handleSubmit = (event) => {
    event.preventDefault();
    if (message && socket) {
      const data = {
        message: message,
        username: username,
      };
      socket.send(JSON.stringify(data));
      setMessage("");
    }
  };

  return (
    <div className="chat-app">
      <div className="chat-wrapper">
        <div className="active-users-container">
          <h2>Active Users ({activeUsers.length})</h2>
          <ul>
            {activeUsers.map((user, index) => (
              <li key={index}>{user}</li>
            ))}
          </ul>
        </div>
        <div className="chat-container">
          <div className="chat-header">Chat Room: {room}</div>
          <div className="message-container">
            {messages.map((message, index) => (
              <div key={index} className="message">
                <div className="message-username">{message.username}:</div>
                <div className="message-content">{message.message}</div>
                <div className="message-timestamp">{message.timestamp}</div>
              </div>
            ))}
          </div>
          <form onSubmit={handleSubmit}>
            <input
              type="text"
              placeholder="Type a message..."
              value={message}
              onChange={(event) => setMessage(event.target.value)}
            />
            <button type="submit">Send</button>
          </form>
        </div>
      </div>
    </div>
  );
}
export default Chat;
Update App Component
Update the App.js with the below code snippet to render the Chat component:
function App() {
  return (
    <div className="App">
      <Chat />
    </div>
  );
}
Testing
To test the real-time chat application we first create two Django users using the Django management command.
python manage.py createsuperuserFollow the prompts to create two user accounts. We’ll use these accounts to simulate two different users interacting in the chat.
Run the Development Server
Ensure that both the Django development server and the React development server are running. If they are not running, start them with the following commands:
# Start Django development server
python manage.py runserver

# Start React development server
cd frontend
npm start
The Django development server usually runs on localhost:8000, and the React development server on localhost:3000.
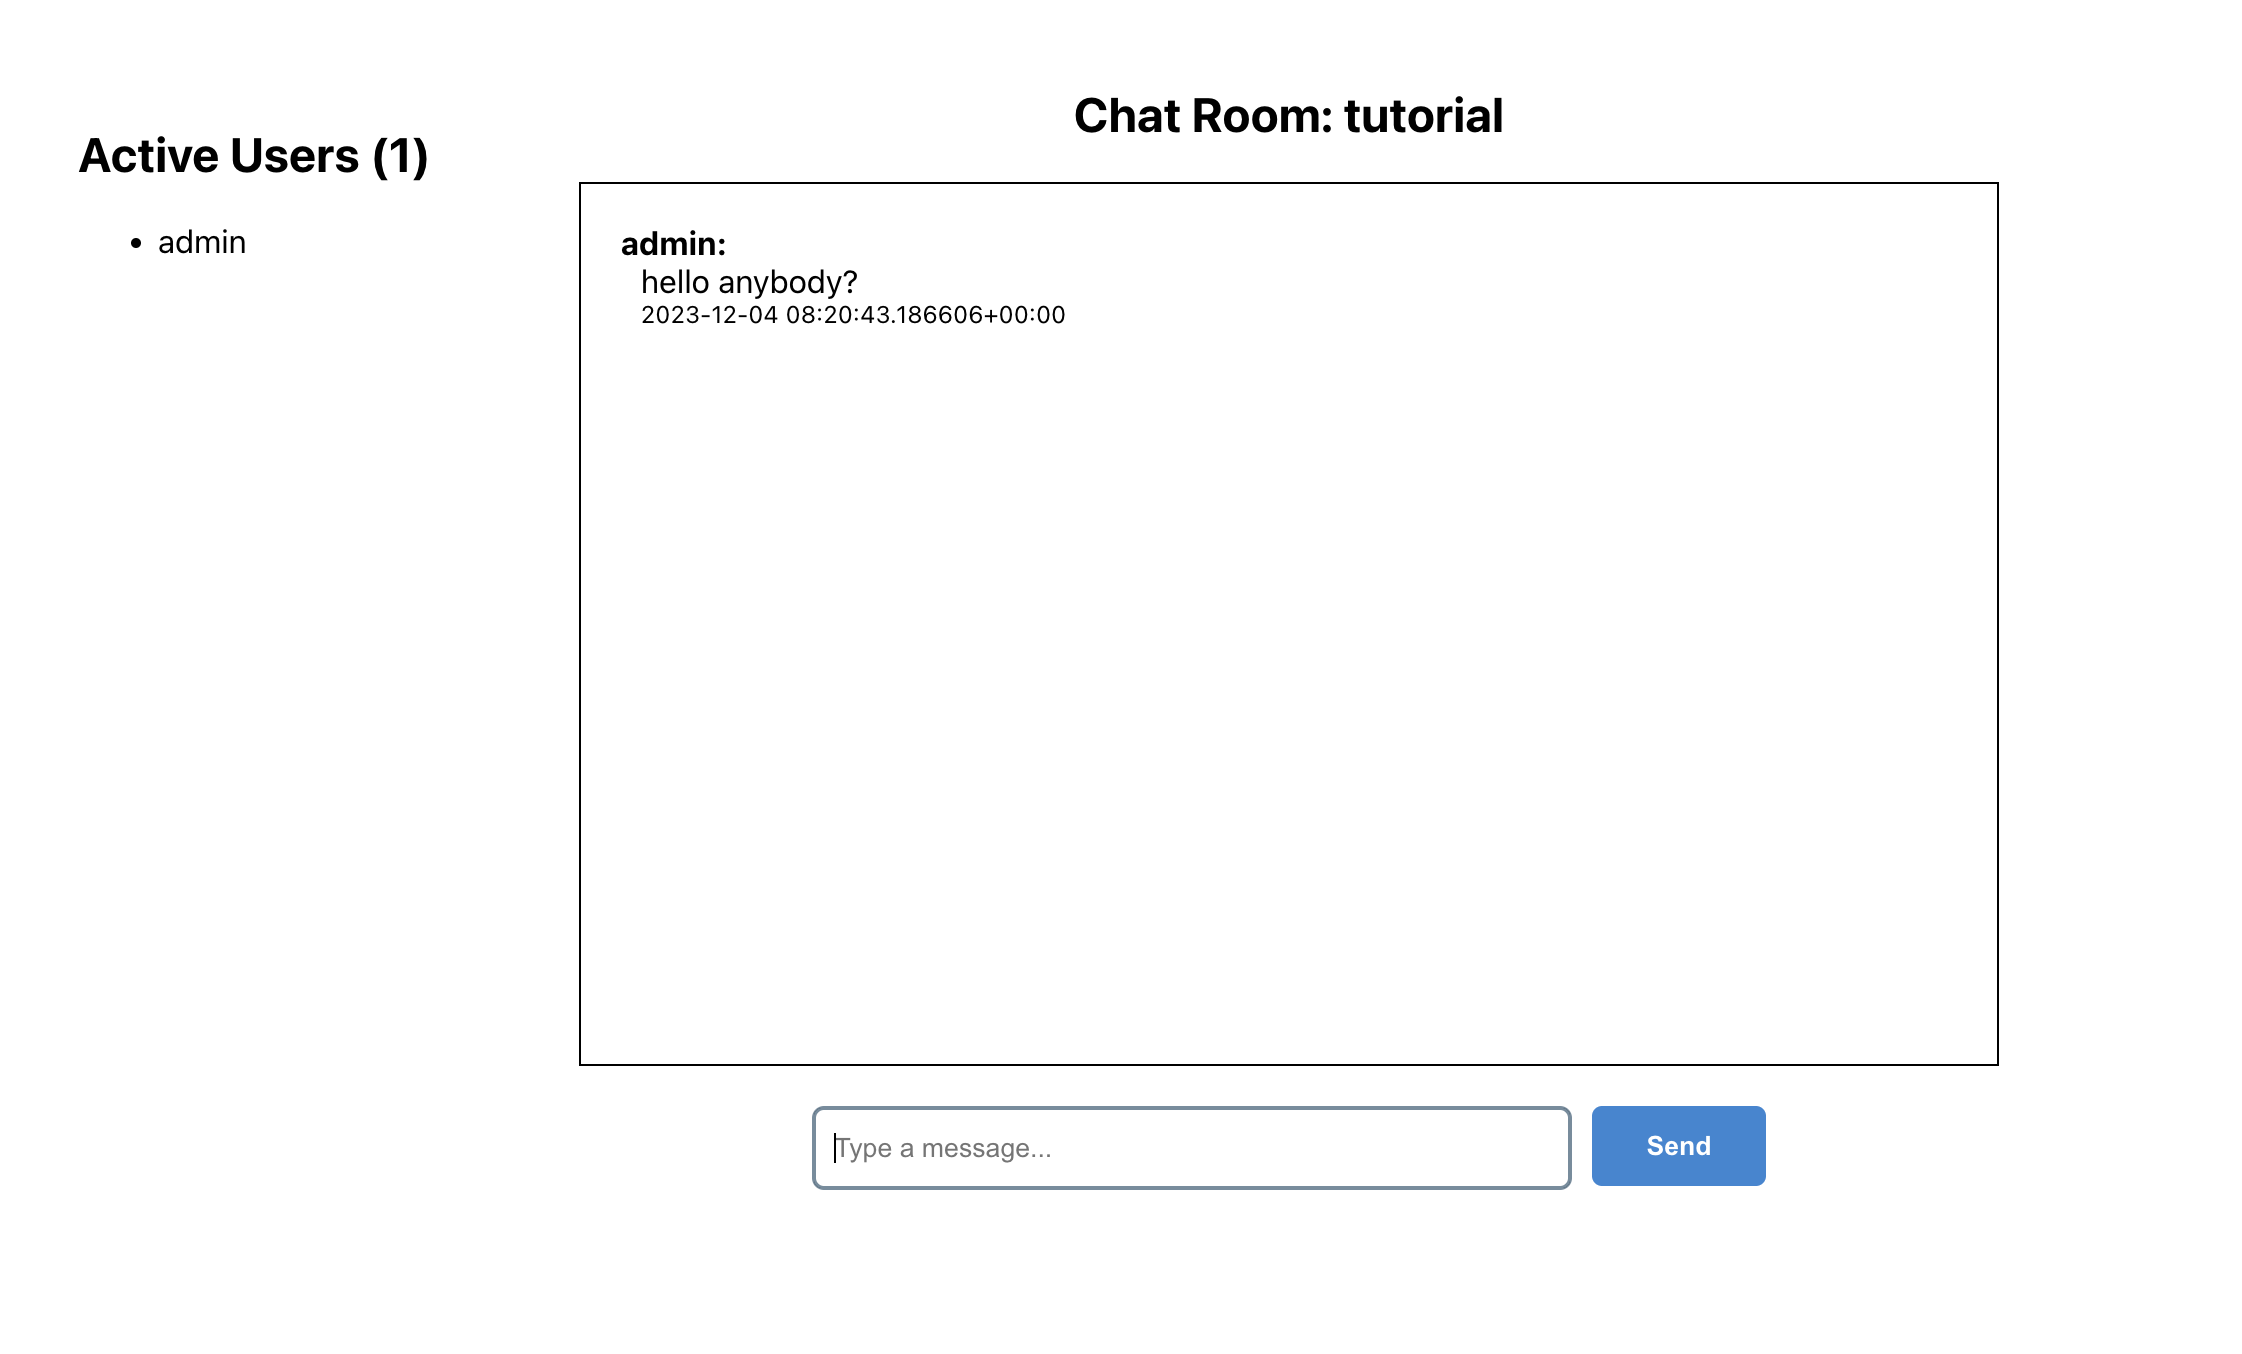
Now, open two separate web browsers. For example, we can use Chrome and Firefox or Chrome and an incognito window. In one browser, log in with one of the Django users you created. Navigate to localhost:3000. You should see a page prompting you to enter a username and a room.

In the other browser, log in with the second Django user. Enter the username and room for each user. Ensure that the room name is the same for both users to join the same chat room. Once both users are logged in and have entered the chat room, start sending messages from one user. You should see the messages appearing in real-time on the other user’s screen.

Conclusion
In conclusion, we’ve learned how to build a robust real-time chat application using Django Channels, Redis, Daphne, and ReactJS. This tutorial covered setting up the backend with Django, configuring Django Channels for WebSocket communication, and integrating Redis for real-time functionality. On the frontend, we used ReactJS to create components for message rendering and WebSocket communication. Download the full source code at GitHub.
Share this content:


